Skip to content


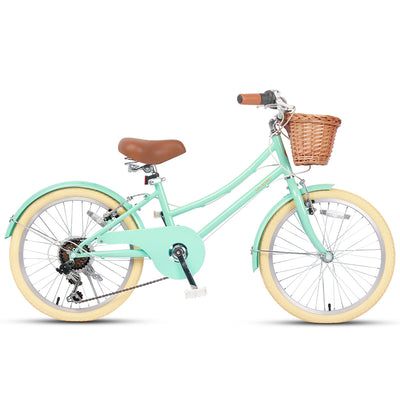


Table of Contents
Teaching toddlers to ride a bike boils down to one simple rule. Master balance first, then pedaling, and finally steering and braking. By breaking these three skills down, most kids aged 2 to 4 can glide on their own in 1 to 3 weeks. They can typically ride a pedal bike within 4 to 6 weeks. This guide covers everything from picking the right bike and gear to a 5-step training plan. You will also find common mistakes to avoid, a realistic timeline, and tips on choosing the perfect bike for every stage.
Why Toddlers Learn to Ride a Bike Differently
Many parents use the same method they grew up with, starting with training wheels and then taking them off. However, a toddler's neurological development and physical build are completely different from older kids. Toddlers aged 2 to 4 do not have fully stable core muscles yet. They rely more on visual cues and feedback from the soles of their feet to stay balanced, rather than leg strength. That is why mainstream training in the US shifted over the past decade. The focus moved from training wheels to a balance-first approach. Kids start by gliding with their feet. This solves the hardest part, balance, before they ever try pedaling.
What You Need Before the First Ride

Before starting the 5-step method, make sure the gear and location are ready. Choosing the wrong gear makes learning much harder, even with the best method. We will break this down into three quick sections below.
Choose the Right Bike Size
The right frame size is the first step to keeping your child interested. Do not base your choice on age. Instead, look at height and inseam, the distance from the crotch to the ankle. When sitting on the saddle, your child should be able to place both feet flat on the ground during the balance stage. For the pedaling stage, their toes should easily touch the ground.
|
Child Height |
Inseam |
Recommended Wheel Size |
Age |
Learning Stage |
|
33–37 inches |
13–16 inches |
12-inch with training wheels |
2–4 years |
Balance & Pedal Basics |
|
35–43 inches |
15–19 inches |
14-inch Pedal Bike |
3–5 years |
Pedal Transition |
|
38–50 inches |
17–21 inches |
16-inch Pedal Bike |
4–7 years |
Independent Riding |
|
41–54 inches |
18–23 inches |
18-inch Pedal Bike |
5–9 years |
Long-Distance Riding |
If your child is just starting out, a balance bike is often the easiest first step. It lets toddlers learn how to sit, push, glide, and stop with their feet before they need to think about pedaling. Choose a lightweight balance bike with an adjustable seat and air-filled rubber tires, so your child can place both feet flat on the ground and ride with more comfort. Once they can glide for several seconds and control the bike with confidence, moving to a 12-inch pedal bike becomes much easier. For many kids aged 2 to 4, this balance-first path feels safer, simpler, and less frustrating.
Pick a Safe Place to Practice
Avoid asphalt roads and sloped concrete ground. The ideal practice area is flat with a little cushioning. Good choices include hard dirt paths, rubber tracks, or empty parking lots. Make sure there are no vehicles within a 60-foot radius. A slight downhill slope of 1 to 2 percent is great for gliding and balance practice. Gravity helps pull your child forward naturally.
Use a Helmet and Simple Safety Gear
A helmet is the only non-negotiable piece of gear; make sure it fits according to the NHTSA bicycle safety guidelines. Choose other pads based on the location. For hard ground, add knee and elbow pads. For grass or rubber tracks, a helmet alone is fine. Make sure your child wears well-fitting sneakers, and high-tops are recommended. Avoid sandals or Crocs. Scraped toes from the pedals are the most common minor injury for toddlers learning to ride.
Step 1: Let Your Toddler Get Comfortable With the Bike
Once the gear is ready, the first step is not getting on the bike. Instead, let your child get comfortable with it. Leave the bike in the living room or yard for a day or two. Let them push it, ring the bell, and give it a name. This step might seem pointless, but it removes about 70 percent of their fear of riding.
Next, have your child straddle the bike with the pedals already removed. With their feet flat on the ground, let them simply walk, stop, walk, and stop. Do this for 5 to 10 minutes at a time.
Step 2: Start With Balance Before Pedaling
Once your child is comfortable, move to the core step of balance. Have them sit firmly on the saddle and push the bike forward with their feet just like walking. Tell them to speed up gradually until they can glide for 3 to 5 seconds with both feet off the ground. Parents should not hold the handlebars or the seat. Instead, lightly support your child's torso from behind, not the bike itself. This helps them find their center of gravity.
Step 3: Teach Steering in a Straight Line
Once your child can glide for over 10 seconds, start practicing straight lines and wide turns. Use sidewalk chalk to draw a 15 to 30-foot straight line on the ground. Have your child glide along that line.
Do not rush into sharp turns. Kids aged 2 to 4 do not have the hand-eye coordination for tight corners yet. Remind them to look where they want to go, not at the handlebars. This is the top rule for every bike coach.
Step 4: Add Braking and Stopping Practice
During the pedal-free stage, stopping just means putting both feet on the ground. Once the pedals are back on for the pedal bike stage, practice braking while stationary. Have your child sit on the bike and repeatedly squeeze the right hand brake, which is usually the rear brake. Let them feel the resistance of the brake pads. Next, have them glide at a low speed. When you yell stop, your child should squeeze the brake and put their feet down. Practice this action until it becomes muscle memory before they start riding for real.

Glerc 12-inch and 14-inch toddler bikes, like the Little Miss and 14-inch Maggie, feature short-reach brake levers. These are easier for small hands to operate. The Little Miss comes with an enclosed chain guard, and the Maggie also uses a protective guard design. These features help reduce the risk of kids touching the chain or getting their pants caught. For toddlers just learning to use hand brakes, these details matter much more than just looks and size.
Step 5: Try Short Pedaling Sessions
Pedaling comes last. Once you put the pedals back on, have your child place one foot on a pedal and push off the ground with the other. This helps them find a pedal, glide, pedal rhythm. Keep each practice under 15 minutes. Put the bike away as soon as your child loses focus. Frequent, short sessions are much better than occasional long ones.
Common Mistakes Parents Should Avoid
Now that we covered the training methods, let's talk about three of the most common yet critical mistakes. They might seem like small things, but they can set your progress back by two weeks.
Holding the Bike Too Much
The longer parents hold the handlebars or the seat, the harder it is for kids to learn. Studies show that kids who are held for more than 30 minutes straight take an average of 11 days longer to learn to ride on their own.
The correct way: Support the child, not the bike, and cut your support in half each time.
Starting on a Bike That Is Too Big
Buying a size up so they can ride it for two more years is the most common mistake. If the bike is too big, your child's feet cannot reach the ground. They will feel terrified and give up immediately. It is much better to choose a bike that is half a size too small rather than half a size too big.
Practicing for Too Long
Toddlers only have a 10 to 20-minute attention span. Beyond that, fatigue ruins their form, and they can develop bad habits. Practicing twice a day for 15 minutes is much more effective than practicing for an hour straight.
How Long Does Learning to Ride a Bike Take?
The table below shows an average timeline based on common family experiences. Use it as a general guide. Every child learns at their own pace, so do not force this schedule.
|
Stage |
Main Task |
Average Time Needed |
|
Getting Used to the Bike |
Pushing, ringing the bell, straddling |
1 to 3 days |
|
Gliding and Balance |
Gliding with feet up for over 3 seconds |
1 to 3 weeks |
|
Straight Lines and Steering |
Gliding along a line for 30 feet |
1 to 2 weeks |
|
Braking Reflexes |
Squeezing the brake within 1 second of a command |
3 to 7 days |
|
Independent Pedaling |
Starting, riding, and stopping smoothly |
2 to 4 weeks |
When Your Toddler Is Ready for the Next Bike
When your child can start, ride 150 feet, brake, and dismount smoothly on their own, it is time for a new bike. Also, when they sit on the saddle, their knees should have a slight bend of about 25 to 30 degrees at the bottom of the pedal stroke. The main signs that they need an upgrade are cramped knees or a standover clearance of more than 2 inches above the top tube. If either of these happens, it is time for a bigger bike.
Final Tips for a Fun First Bike Ride
Here is one final piece of advice for parents: keep riding fun. Bring a water bottle, sticker rewards, and their favorite toy to sit in the basket. A vintage kids bike with a hand-woven wicker basket is popular for a reason. It is not just about the looks. It is because a child will ride for ten more minutes just to take their toy outside. Every moment they actively want to ride is when the real learning happens.
FAQ
What age can a toddler learn to ride a bike?
You can read our detailed kids bike age and size guide for a full breakdown. Generally, balance practice can start as early as 18 months. Age 2 is the perfect starting point. Introducing a two-wheel pedal bike usually works best between ages 2.5 and 3.5. Age is not a strict rule. The real test is whether your child can walk on their own and understand commands like stop and go.
How do I know if the bike fits my toddler?
The easiest way to check is a quick seated test. When your child sits with the saddle at its lowest position, their entire foot should rest flat on the ground. This is perfect for the balance stage. If they can touch the ground with the balls of their feet, it is right for the pedal stage. If only their tiptoes can barely touch, the bike is too big.
What should I do if my toddler is scared to ride?
Most fear comes from a single fall or a bike that feels out of control. Take a step back. Take the pedals off to return to balance mode, or move to softer grass. Let your child say they do not want to ride today. Give them a 3 to 5-day break before trying again. Forcing them will almost always make the fear worse.
How often should we practice learning to ride a bike?
Practicing 3 to 5 times a week for 10 to 20 minutes is the ideal routine. Short, frequent sessions help the brain turn these movements into muscle memory more efficiently. Cramming a 2-hour session into the weekend actually backfires. Fatigue and frustration quickly outweigh any progress.

GLERC creates stylish, durable kids bikes designed to help families ride together with confidence. From sizing guidance to assembly support, our team shares practical advice to make every ride safer and more fun.